One of the most prominent features that Apple brought to the iPhone with iOS 17 is the Contact Poster, which lets you design your own digital calling card using text, colours, and photos. When you call someone on an iPhone to iPhone and they have you saved in their contacts, your Contact Poster will show up on their screen.
It provides you the chance to be creative with how you want to come across to your friends, family, or coworkers and replaces the much smaller notification and thumbnail photo that was previously displayed.
You can modify your Apple ID avatar based on the contact poster while configuring your contact poster. For instance, if you go to Settings on your iPhone or Mac, you’ll see that your profile picture can be updated to reflect whatever you’ve chosen to serve as your Contact Poster, be it a recent photo you took or a specific Memoji.
Tech Droider shared a post on Twitter:
Apple iOS 17 will let users personalize Contact Poster (Phone Call Background) pic.twitter.com/DAIPU5DFvK
— TechDroider (@techdroider) June 6, 2023
To find the Contact Poster settings in iOS 17:
- Open your iPhone’s Contacts app.
- Tap your name at the top of the list of people you know.
- Pick a Contact Photo and Poster.
Your contact poster options will be the first thing you see. You can choose whether to share your name, photo, and first and last names, as well as whether you want to automatically share your posters with everyone in your contact list or have iOS prompt you each time you call someone on your contact list. You have the opportunity to be imaginative in terms of what other people would perceive when you call them.
Check out some of the most recent trending articles:
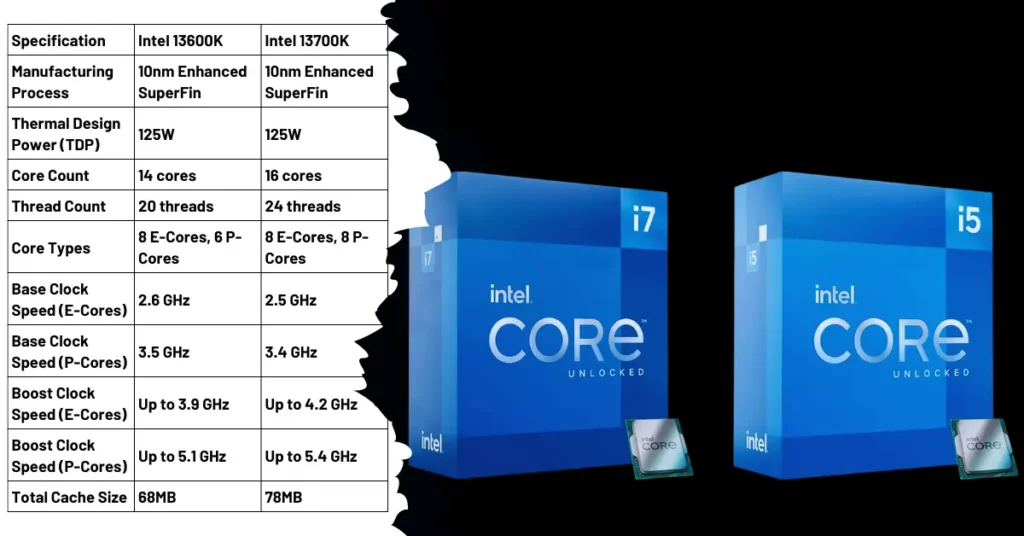
- Intel Core 13600K vs 13700K: Performance, Specs, and Price
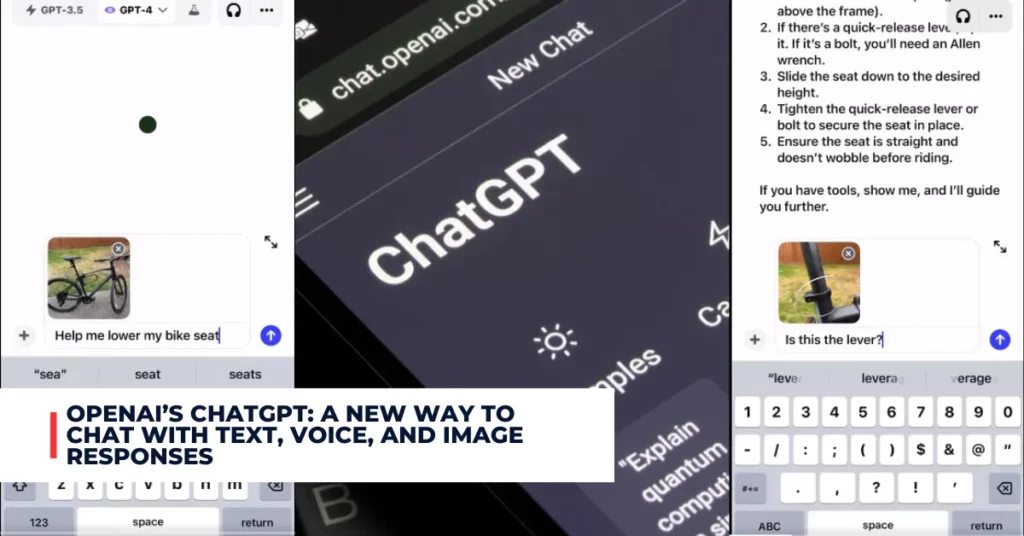
- OpenAI’s ChatGPT: A New Way to Chat with Text, Voice, and Image Responses
To create a new Contact Poster:
- Select Edit, then click the “plus” sign. You can also utilize the Create New option, which is on the far right of your current Contact Posters if you swipe to the right.
- Choose Camera (to take a new photo), Photos (to utilize an existing photo), Memoji, or Monogram (to add writing) at the bottom of the screen to determine the type of contact poster you wish to make.
When you make a new Contact Poster with a Camera or Photos:
- Take a new picture or pick one from the ones you already have.
- Swipe left or right to change fonts and images.
- Tap the colour swab in the lower right corner to change any effect’s colour. (It won’t be available for your original photo or, logically, a black-and-white picture.)
- To change the size and crop, pinch in or out on the picture.
- If you tap the words at the top, you can change their size, style, and colour.
When you make a new Contact Poster with Memoji:
- Choose a Memoji from the list that pops up, or tap + to make a new one.
- Once you’ve made a new Memoji or changed an old one, you can choose an expression or tap the camera icon to take a picture of your own expression and save it.
- On the next screen, you can tap the colour swab (lower left) to choose a background colour, change the Memoji picture and keep the expression (first icon in the lower right), or turn the depth effect on or off (second icon in the lower right).
- If you tap the words at the top, you can change their size, style, and colour.
When you make a new Contact Poster with Monogram, you:
- Tap the colour swab (lower left) to choose a colour for the background.
- If you tap the words at the top, you can change its size, style, and colour.
- By tapping the letter(s) in the bottom right corner, you can change the big letters in the middle of the board. You can choose between one and two characters, like your names.
No matter what kind of Contact Poster you’re making, when you’re done, tap Done and then click Continue on the sample screen. You will then be taken to the Contact picture page, where you can choose to use your new Contact Poster to change your main contact picture, which is the one used for your Apple ID on all of your devices and in other people’s contact lists.
If you don’t want to do this, tap Skip. If you do, tap Continue. (You can also click the Continue button and choose Choose a Different Photo.) If you tap Skip or Continue, you’ll go back to the screen you saw when you first tapped Contact Photo & Poster, and your new Contact Poster will be set.
Edit or Change Your Contact Poster
To change between the Contact Posters you’ve made and make changes to them:
- Go back to Contacts, tap on your name, and then choose Contact Photo & Poster.
- Tap Edit once more.
- Swipe left or right to choose a Contact Poster or tap Customize to change one.
Once you choose Customize, you can choose Contact Photo or Poster and go back to the screens we’ve already seen. Swipe up on a Contact Poster and tap the red trash can icon that appears to get rid of it.
It’s important to note that Contact Posters work well with NameDrop, another new feature in iOS 17. NameDrop is meant to make exchanging contact information with someone faster and easier. Bring your iPhone close to someone else’s iPhone or Apple Watch, and if both devices have Bluetooth turned on, you should get a prompt asking if you want to transfer your contact data.
This prompt shows the usual Contact Poster you’ve set, and of course, when you share a contact, your Contact Poster also shows up on the other person’s iPhone.